3D printing has transcended its early niche status to become a versatile tool for inventors, educators, artisans, and manufacturers alike. What once required expensive industrial equipment is now accessible on desktop workstations, empowering enthusiasts to transform pixel-perfect digital designs into physical models in hours. Yet this creative alchemy depends on understanding an interconnected ecosystem: hardware platforms, material families, slicing software, and post-processing workflows. Whether you’re curious about choosing between filament extrusion and resin curing, or you seek tricks to fine-tune layer adhesion and surface finish, the following exploration will help you navigate the layered craft of three-dimensional fabrication.
The Foundation: Printer Technologies and Trade-offs
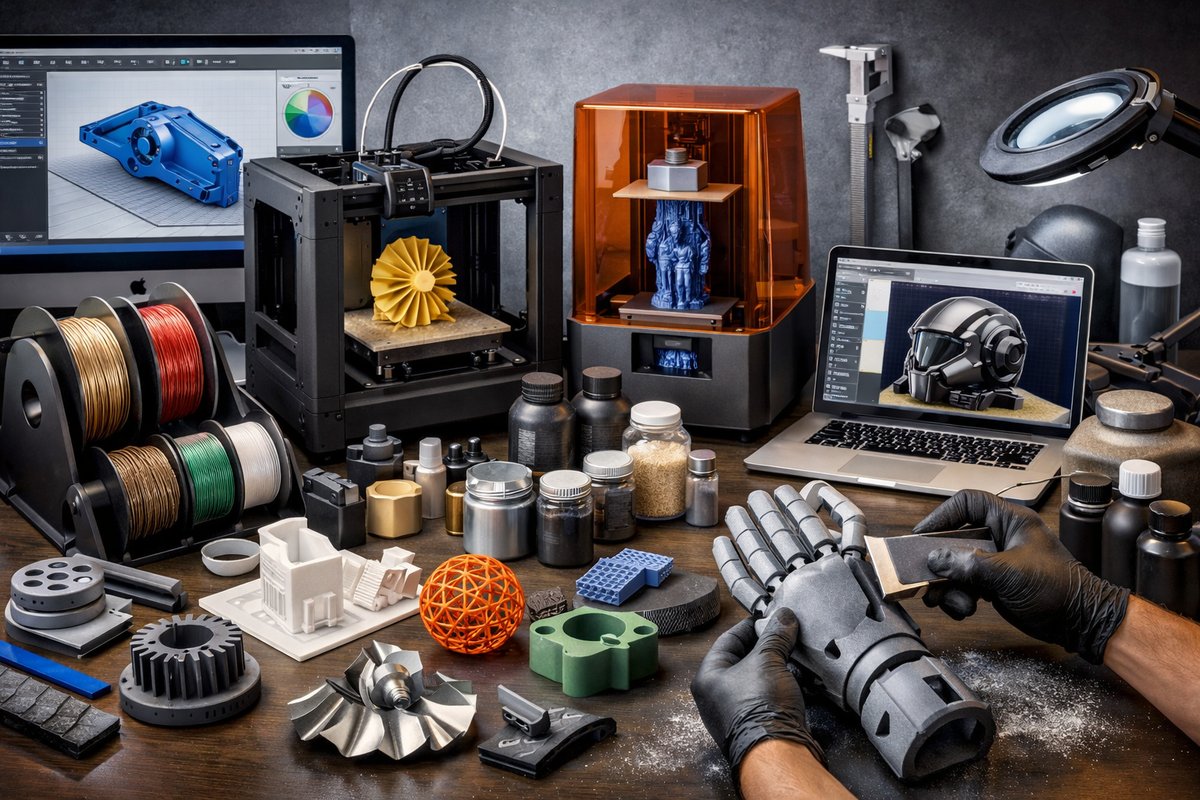
Every 3D printing journey begins with selecting a machine that aligns with your goals. The two most common desktop platforms are fused deposition modeling (FDM) and vat photopolymerization (commonly called resin printing). Each offers distinct advantages:
• FDM Printers: These machines extrude molten thermoplastic through a nozzle, building objects layer by layer. They shine in prototyping larger parts, imparting strong mechanical properties and low material costs. Typical layer heights range from 50 to 300 microns, balancing resolution with speed. Modern desktop FDM machines boast auto bed leveling, enclosed heated chambers, and dual extrusion for composite or soluble supports.
• Resin Printers: By selectively curing liquid photopolymer with a UV light source, resin printers achieve sub-50-micron layer thickness and intricate details. Ideal for jewelry prototypes, dental models, and miniatures, resin printing demands careful handling of chemicals and post-curing equipment. The trade-off is slower build volumes and slightly higher consumable prices compared to FDM filaments.
Beyond these, industrial solutions such as selective laser sintering (SLS) and digital light processing (DLP) push boundaries in material diversity and throughput-but for most makers’ benches, FDM and resin systems capture the sweet spot between price and performance.
Choosing the Right Filament and Resin
Materials science lies at the heart of every successful print. Tensile strength, flexibility, heat resistance, and surface finish all stem from selecting the right feedstock. Here’s a snapshot of popular families:
• PLA (Polylactic Acid): A biodegradable thermoplastic derived from renewable resources. Its low melting temperature and minimal warping make it a beginner favorite. Ideal for decorative parts, prototypes, and educational models.
• PETG (Polyethylene Terephthalate Glycol-modified): Combining PLA’s user-friendliness with added toughness and chemical resistance. PETG can endure moderate heat and is less brittle than PLA, suiting mechanical parts and outdoor components.
• ABS (Acrylonitrile Butadiene Styrene): Known for its impact resistance and higher glass transition temperature. ABS requires an enclosed heated chamber to minimize warping and emits fumes-so good ventilation is essential.
• TPU (Thermoplastic Polyurethane): A flexible filament that yields rubber-like elasticity. Great for gaskets, phone cases, and wearable items. TPU demands a direct-drive extruder and slower print speeds to prevent filament jamming.
• Standard Photopolymer Resins: Offer smooth, high-detail surfaces, but may be brittle. Used for miniatures, prototypes, and dental applications.
• Engineering Resins: Enhanced toughness, heat resistance, or elasticity. These specialized chemistries suit functional testing, snap-fit parts, and moving assemblies.
Balancing material cost, mechanical properties, and safety considerations will guide you toward the best feedstock for each project.
Slicing Software: Bridging Design and Reality
At the heart of every print lies slicing software, which translates a CAD or STL file into printer instructions known as G-code. Common slicing platforms offer features such as:
• Automatic Support Generation: Algorithms calculate overhangs and generate scaffolding to prevent collapse mid-print.
• Infills and Shell Thickness Control: Adjust density patterns (grid, honeycomb, gyroid) to optimize strength-to-weight ratios.
• Temperature and Flow Calibration: Fine-tune nozzle and bed temperatures, extrusion multipliers, and retraction settings to prevent stringing, under-extrusion, or blobs.
• Adaptive Layer Heights: Dynamically change layer thickness in critical regions to enhance detail without sacrificing overall print speed.
Mastering slicing parameters often requires methodical test prints. Calibration cubes, temperature towers, and stringing tests help you pinpoint ideal settings for each material and nozzle diameter.
Calibration and Maintenance: The Unsung Heroes of Consistency
Even the most advanced printer can churn out subpar parts if not properly calibrated and maintained. A few best practices ensure repeatable results:
• Bed Leveling and First-Layer Adhesion: A perfectly level build surface ensures uniform layer deposition. Use feeler gauges, paper tests, or automatic mesh leveling to adjust bed screws. Experiment with adhesives like glue sticks, specialized bed tapes, or high-temperature adhesives for challenging materials.
• Nozzle Health: Deposits of old filament or burnt debris can cause clogs. Regularly perform cold pulls (also known as atomic pulls) and swap nozzles when wear affects print quality.
• Lubrication and Lubricants: Apply printer-specific grease or oil periodically to linear rods, lead screws, and bearings to reduce noise and prolong component life.
• Firmware Updates and Hardware Upgrades: Staying current with firmware patches can unlock new features like linear advance or advanced bed-leveling routines. Upgrades such as all-metal hotends, direct drive extruders, and upgraded motion systems can breathe new life into an aging machine.
Post-Processing: From Raw Prints to Polished Artifacts
A freshly ejected print often needs refinement before it’s display-ready. Post-processing techniques elevate the visual and mechanical finish:
• Support Removal: Use flush cutters, deburring tools, or chemical dissolvable supports for multi-material systems. Work under magnification when handling intricate miniatures.
• Sanding and Polish: Start with medium grit sandpaper to remove layer lines, then progress to fine grits and polishing compounds. For resins, rinse prints in isopropyl alcohol and cure them under UV light for uniform hardness.
• Surface Treatments: Airbrushing, spray painting, or hand-painting can bring models to life. For functional parts, consider vapor smoothing for ABS to achieve glossy, watertight surfaces.
• Mechanical Assembly and Fasteners: Incorporate nuts, bolts, and inserts for robust joints. Heat-set brass inserts embed into thermoplastics under controlled temperatures, creating threaded connections that endure repeated use.
Sustainability and Material Recycling
As the maker movement grows, so does its environmental footprint. Embracing sustainability can take many forms:
• Recycling Filaments: Spool remnants from various prints can be shredded and processed into new filament using desktop recycling machines-though the process can degrade material properties over time.
• Biodegradable and Bio-resins: PLA and other plant-based materials reduce reliance on petroleum. Emerging plant-based resins offer lower toxicity and easier disposal pathways.
• Energy Efficiency: Modern printers with insulated enclosures and smart power management consume less electricity. Running batches overnight during off-peak hours can further reduce grid strain.
• Digital Sharing and Remote Printing: Cloud-based slicing and print-farm management minimize wasted test prints by centralizing calibration profiles and sharing optimized settings across teams.
Cultivating Community and Skills
Whether you’re troubleshooting elephant’s foot, dialing in perfect overhangs, or exploring multi-color printing with purge towers, community resources accelerate learning:
• Online Forums and Social Platforms: Makerspaces, Discord channels, and dedicated 3D printing forums offer galleries, troubleshooting guides, and curated material profiles.
• Calibration Guides and Benchmark Models: STL libraries host standard models-benchy boats, calibration cubes, tensile test bars-that serve as performance yardsticks.
• Local Maker Groups and Workshops: Hands-on meetups allow new users to see printers in action, learn safety practices for handling resins, and test different materials before committing.
The Future: From Desktop to Distributed Manufacturing
As additive manufacturing technologies evolve, desktop printers are increasingly integrated into larger production workflows. Distributed manufacturing networks allow designers to transmit G-code files globally, with local print hubs fulfilling orders on demand. Bioprinting, multi-material mixing, and even embedded electronics are on the horizon. By building a strong foundation in hardware, materials, slicing, and post-processing today, you’ll be ready to ride the next wave of innovation in three-dimensional creation.
Embarking on 3D printing is both an art and a science. Each success and setback refines your intuition, pushing you to discover new material combinations, hone slicing strategies, and achieve finishes once reserved for industrial labs. The layered process-from digital sketch to finished object-is a testament to human curiosity, resilience, and the power of making ideas tangible.