From rapid prototyping in design studios to home workshops turning dreams into desktop statues, 3D printing has transformed how we make objects. Gone are the days when additive manufacturing was confined to industrial labs and aerospace applications. Today, hobbyists, educators, and small manufacturers share a common toolkit: a digital model, a printer, and a supply of materials. Yet beneath that apparent simplicity lies a complex world of technologies, chemistry, and precision engineering. Navigating choices from filament types to post-processing setups can feel overwhelming-but understanding the fundamentals unlocks the potential to build functional parts, artistic sculptures, and everything in between.
At its core, 3D printing-or additive manufacturing-creates objects layer by layer, guided by instructions in a slicing file. Each layer fuses to the one below, forming shapes that would be difficult or impossible with subtractive techniques like milling. Since its inception, printers have evolved along two main branches: material extrusion, commonly known as FDM (Fused Deposition Modeling), and vat polymerization methods such as SLA (Stereolithography) or DLP (Digital Light Processing). Both approaches have their strengths and trade-offs, and choosing the right technology depends on your priorities: durability, surface finish, speed, or cost.
Balancing Strength and Ease: FDM Printing
For many newcomers, FDM stands out for its straightforward workflow. A thermoplastic filament-often polylactic acid (PLA) or acrylonitrile butadiene styrene (ABS)-feeds through a heated nozzle, depositing molten strands on the build plate. PLA remains popular thanks to its low melting point, minimal warping, and eco-friendly origins (it’s derived from corn starch). ABS, by contrast, offers greater toughness and temperature resistance but demands a heated enclosure to prevent cracking. Beyond these commons, specialized filaments like PETG (for chemical resistance), TPU (for flexible parts), and composite blends embedded with wood, carbon fiber, or metal powder open creative and functional possibilities.
Settings like nozzle temperature, print speed, and layer height profoundly affect results. A higher nozzle temperature can improve layer adhesion at the cost of stringing, while slower speeds yield finer details but extend print time. Layer height-often ranging from 0.1 mm to 0.3 mm-balances resolution versus build speed. Learning to dial in these parameters for each material makes the difference between fragile prints riddled with gaps and robust parts ready for assembly.
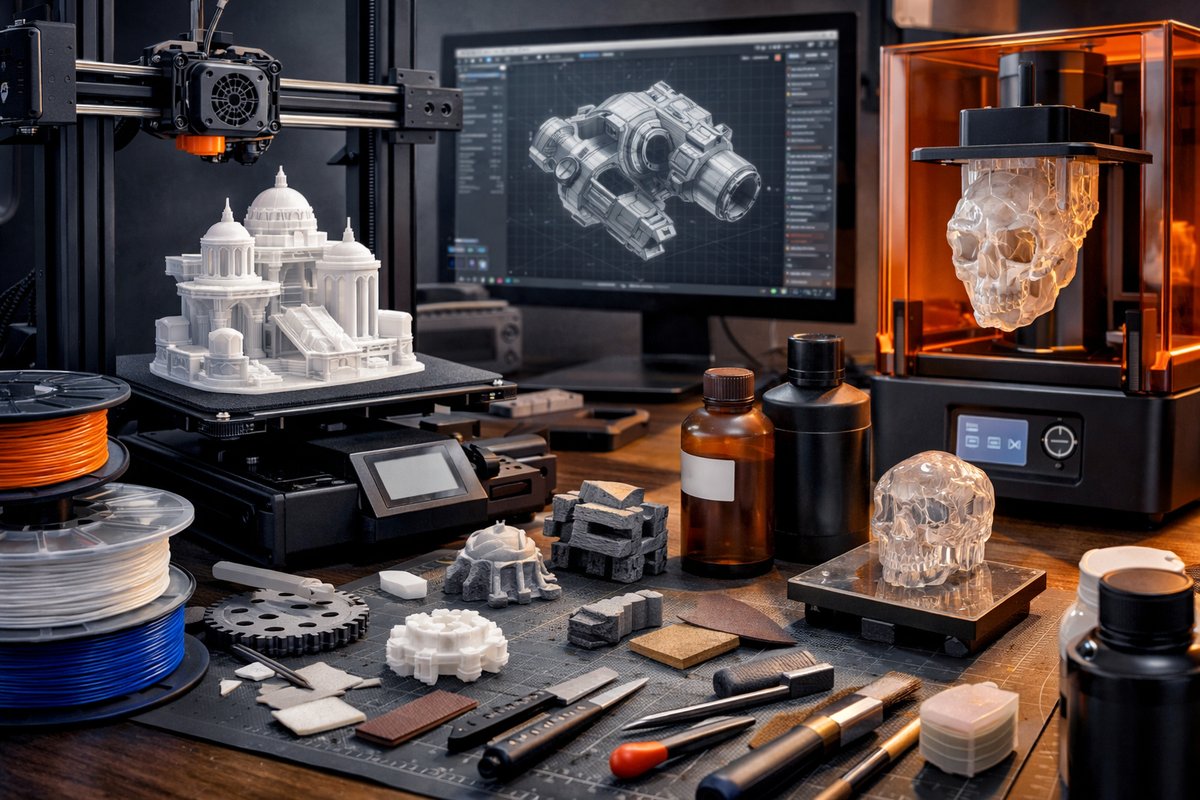
Fine Details in Resin: SLA and DLP Techniques
When surface finish and precision outweigh cost or size constraints, resin-based printers come into their own. SLA and DLP cure liquid photopolymer resins using ultraviolet light, yielding parts with smooth faces and crisp features down to tens of microns. This precision makes vat polymerization printers ideal for jewelry prototypes, dental models, miniatures, and intricate art pieces. However, resins can be brittle, sensitive to light exposure before curing, and can emit fumes that necessitate proper ventilation and protective gear.
Post-processing resin prints involves rinsing excess liquid in isopropyl alcohol or specialized solvents, then curing them under a UV lamp to complete polymerization. Achieving uniform cure and avoiding overexposure takes practice, but the resulting parts often require minimal sanding compared to FDM prints. Because resin chemistry varies-standard, tough, flexible, castable, biocompatible-users should test small samples to understand each formulation’s printability and final properties.
Design Tools: From Sketch to Slicer
A beautifully printed object starts as a digital model. Entry-level users might begin with block-based or browser-based tools that simplify basic shapes. For more control, open-source CAD programs allow parametric design, letting you tweak dimensions without rebuilding geometry. Sculpting applications bring organic modeling into reach, while mesh editing tools refine scanned data or repair STL files before slicing.
Slicing software translates these models into layer instructions-G-code for FDM, or exposure maps for resin printers. Many slicers offer presets for common materials, automated support generation, and built-in profiles for popular printer models. Advanced users can dive into the g-code itself, inserting commands to pause at a certain height for part modifications or embedding custom routines for specialized hardware like multi-material extruders or filament changers.
Mastering Bed Adhesion and Calibration
A level build plate and consistent first-layer adhesion set the stage for successful prints. Some FDM printers include auto-leveling sensors that probe multiple points and compensate for uneven surfaces. Manual leveling remains an art, often involving feeler gauges or thin paper under the nozzle. Adhesion aids range from simple painter’s tape and glue sticks to specialized build surfaces and magnetic flexible plates that make part removal a snap.
Resin printers, on the other hand, rely on film membranes at the base of their resin vats. Periodic maintenance-replacing worn films and ensuring vat cleanliness-keeps prints stable. Even slight shifts or resin scrubbing can impair the first few layers, so keeping the FEP film tensioned and free of cured fragments is critical.
Post-Processing: Smoothing, Painting, and Assembly
Whether you’re sanding FDM ridges or curing resin parts, post-processing transforms raw prints into finished pieces. Tools like digital calipers verify dimensional accuracy, while a print removal spatula and razor blade help separate models from build surfaces. Sandpaper of various grits, solvent vapors (for smoothing ABS), and filler primers smooth imperfections. For vibrant color or protective coatings, hobby-grade acrylic paints, spray lacquers, and clear coats bring your objects to life.
Beyond finishes, many projects involve assembly. Threaded inserts or M-3 nuts can reinforce 3D-printed joints. Hot-air pens and solvent weld glues enable precision joining of small parts. If electronics or mechanical components join the mix, planning for tolerances and cable routing in your CAD model saves headaches later on.
Advancing Your Workflow: Multi-Material and Hybrid Builds
Some printers now feature multi-extrusion heads or resin-filament hybrids, letting you combine rigid and flexible sections in a single operation. Incorporating conductive filaments opens doors to embedded circuits, functional sensors, and LED pathways. Experimental users even embed metal inserts mid-print or pause prints to embed magnets, wiring, or nuts, creating true hybrid objects that blend materials and functions.
Automation also plays a growing role. Filament sensors detect runouts, built-in cameras let you monitor prints remotely, and modular tool heads allow CNC milling or laser engraving on printed parts. These workflows borrow from industrial additive manufacturing, democratizing capabilities that once required specialized equipment.
Towards Circularity: Recycling and Sustainable Practices
Material waste remains a challenge in many maker spaces. Fortunately, countertop filament recyclers can turn failed prints into new spools, closing the loop on PLA and ABS scraps. Some communities offer pellet extruders for low-cost recycled filament. Choosing biodegradable or bio-based resins further reduces environmental impact, while careful print orientation and support minimization cuts down on sacrificial material.
Beyond plastics, emerging research explores 3D printing with alloys, ceramics, and even foodstuffs. While these technologies often sit in labs, they point toward a future where distributed manufacturing can handle critical repairs in remote locations, create custom medical implants on demand, or revolutionize construction with layered concrete printing.
Whether you’re crafting functional prototypes for engineering testing or sculpting an otherworldly diorama, understanding the interplay of materials, hardware, and software elevates every project. Mastering basic calibration and post-processing lays the groundwork for advanced techniques like multi-material embedding and recycled filament workflows. At its heart, 3D printing empowers creativity by removing the barriers between concept and physical object. As tools become more accessible and materials more diverse, additive manufacturing will continue reshaping industries-and home workshops-one layer at a time.
Ready to take your printing to the next level? Start by experimenting with new materials, refining your slicing profiles, and investing in the right tools to streamline calibration and post-processing. Each upgrade-whether a precise measurement instrument or a reliable flexible build surface-pays dividends in reduced failures and higher-quality prints. With practice, you’ll unlock techniques once reserved for specialists and turn your desktop machine into a powerful creative laboratory.